[Main Window] → [Supplementary Features] → [Begin Playtest]
·Before creating a game installer, you can check your game for errors and opportunities for improvement. This process, called playtesting, is extremely important.
·Before doing a playtest, map data needs to be saved. If the data has not been saved, a message will be displayed to confirm if the data should be saved. Clicking Yes will save the data and begin the playtest.
·If [Fullscreen] is disabled, a new window will open and display the game's start screen.
·If [Fullscreen] is enabled in the [Game] menu (button is pressed in), the game will take up the entire screen.
·In addition, if [Display Title Screen] in the same menu is enabled, the title graphic will be shown on the start screen.
oIf [Display Title Screen] is disabled and the default title screen is also disabled (in the [System] tab of the database), the "Load Game" screen will be shown when the playtest is started. Pressing a cancel key (such as [ESC]) from the "Load Game" screen will start the game normally.
·During the playtest, all editor functions will be disabled, and changes to settings and data will not be possible. Only variables and switches can be modified from the debug screen.
1.Playtest Controls
·Game controls for playtesting are the same as those for a finished game. The controls that are restricted to playtest mode are as follows:
Shift |
Skips through text shown in the message window. |
Ctrl |
If held while moving, random enemy encounters will not occur. In addition, non-passable map tiles will become passable. |
F9 |
Opens the debug screen (see below). |
F10 |
Terminates the event currently being processed. This is used in situations such as when the game enters an infinite loop and you wish to proceed with the test. |
2.Debug Screen Controls
·The status of switches (ON or OFF) and the numerical value of variables can be viewed and changed from the debug screen.
·The screen is split into 2 lists. The contents of the right list (current values of switches and variables) change depending on the location of the cursor on the left list.
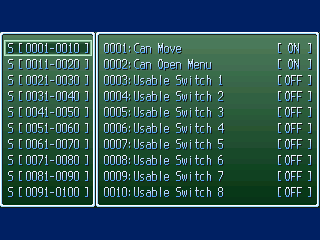
·The option selected on the left list is displayed on the right list. Items that begin with S are switches and items that begin with V are variables. The numbers in parentheses are the range that will be displayed on the right. List controls are as follows:
(When the cursor is on the left list)
Left and right directional keys |
Changes the left list item. |
Up and down directional keys |
Moves the cursor up and down within the list. |
Select key |
Moves the cursor to the right list. |
Cancel key |
Closes the debug screen. |
(When the cursor is on the right list)
Left and right directional keys |
Not used. |
Up and down directional keys |
Moves the cursor up and down within the list. |
Select key |
Changes the values. |
Cancel key |
Moves the cursor to the left list. |
(Changing values)
Switch |
Press the select key to toggle ON/OFF. |
Variable |
Use the up and down directional keys to adjust the value and confirm with the select key. |
