[Database] → [Animations] → [Frame View Editing]

Placement
oTo place a cell in the frame, follow these steps.
1.In the frame (7), specify the frame number to edit.
2.In the cell frame palette (9), specify the cell frame to place.
3.Click the frame viewer. The cell frame specified in the edited frame will be placed as a cell.
Display/Select
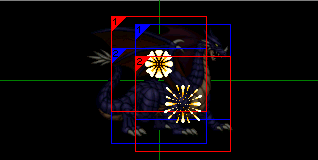
·A rectangular frame will be displayed according to the cell's size.
·The number on the top left of the box is the cell number. The larger the cell number, the closer it will be displayed to the front of the frame.
·The outline color has the following meanings.
oWhite: The currently selected cell
oRed: Deselected cells
oBlue: Cells placed in the frame previous to the current frame
·The selected cell can be changed by clicking within the box of the desired cell (blue-framed cells cannot be selected). In addition, holding down the control key and then clicking and dragging will allow the cell immediately behind that cell to be selected.
Move
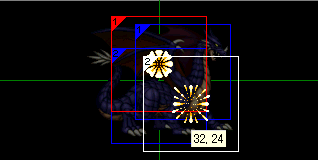
·To move an existing cell, click and drag within the box of the desired cell, and drop the cell in its new location. While dragging, the coordinates of the cell respective to the center of the screen (when the Y-coordinate baseline is at the center) as the origin will be displayed.

·When the shift key is held while dragging any cell, all cells in the frame will be moved at the same time.
Operation
·When a cell is right-clicked, a shortcut menu to edit the cell will open. The commands within the menu are as follows. As a note, the [Settings] command can also be called by double-clicking the cell.
Set |
Opens the [Cell Settings] window, where the image display size, opacity, and color can be adjusted. |
Cut |
Moves the cell onto the clipboard, and removes it from the frame viewer. |
Copy |
Move the cell onto the clipboard. |
Paste |
Places the copied cell in the frame as a new cell. |
Delete |
Removes the cell. |
Increase Priority |
Increases the cell number by 1. If there is a cell with the same number, their numbers will be exchanged. |
Decrease Priority |
Decreases the cell number by 1. If there is a cell with the same number, their numbers will be exchanged. |
Cell Settings

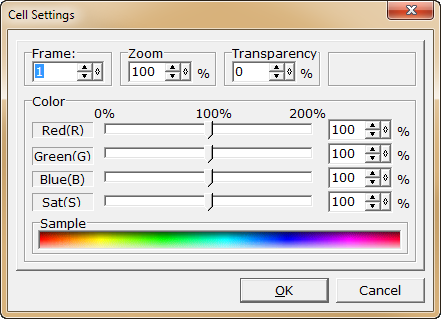
·In the [Cell Settings] window, the display size, opacity, and color of the cell can be changed.
·Under [Frame], specify the frame number of the cell.
·Under [Zoom], specify the size increase or reduction of the cell within a range of 20~800% of the original size.
·Under [Color], specify the tint color for the cell using the 4 components [Red (R)], [Green (G)], [Blue (B)] and [Saturation (S)]. With the original image as 100% in all components, specify the strengths of each component within a range of 0 to 200%. The adjusted colors will be displayed under [Sample].