[Map] → [Map Properties]

* The following settings are identical to those of the [Map Settings] window.
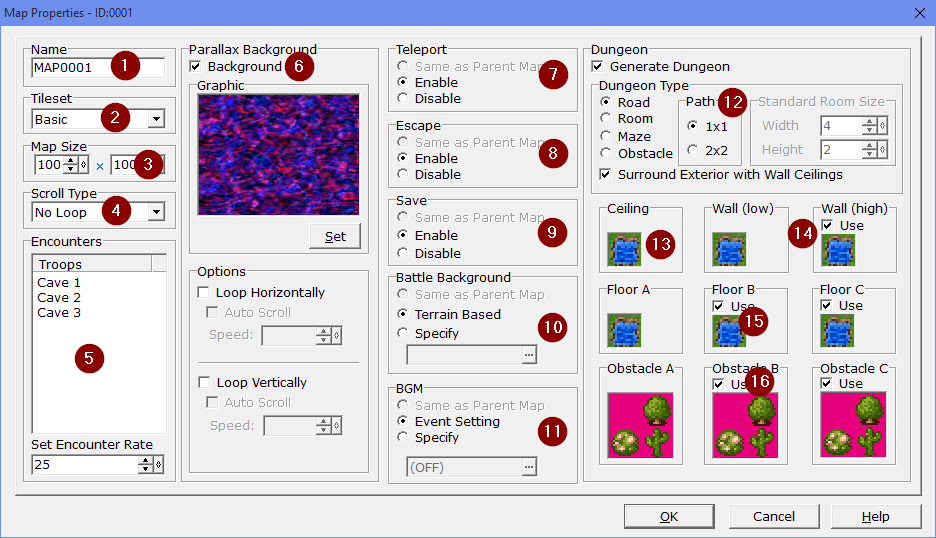
1.Name
·Specify the map name within 24 characters.
·This name will be displayed as the name of a potential destination when using a [Transfer]-type skill. A descriptive name such as “World Map” or “Dungeon 1F” is recommended.
2.Tileset
·Select the tileset to use on the map from the dropdown menu.
3.Map Size
Specify the size of the map in terms of tile size. The left field is for horizontal width, and the right field is for vertical height. The size range is from 20x15 to 500x500.
* Note
The map size is always defined with respect to coordinates (0, 0) (the tile in the top left corner) as the origin.
Please be aware that if the map size is reduced, the excess tiles will be deleted. For example, if a 100x100 map is changed to 50x50, the tiles and events outside of the range of (0, 0) to (49, 49) will be deleted.
4.Scroll Type
·Specify from the dropdown menu how the edges of the map should be connected to make it loop.
oNo Loop: The map will not loop.
oLoop Vertically: Connects the top and bottom edges of the map so that it loops in the vertical direction in-game.
oLoop Horizontally: Connects the left and right edges of the map so that it loops in the horizontal direction in-game.
oBoth Loop: Applies both horizontal and vertical loops in-game.
5.Encounters
·Specify the enemy groups that can be encountered randomly while moving around on the map.
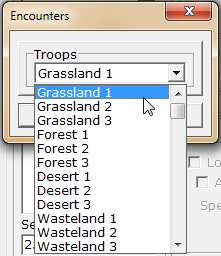
·Double-clicking on the empty space at the top of the [Troops] list (the highlighted area) opens the [Encounters] window. Specify the names of the enemy groups to encounter from the dropdown list.

·The probability of enemy groups appearing in battle is the same for all enemy groups. If the list contains 5 items, the probability of each enemy group appearing is 20% (1/5). To increase the probability of a specific enemy group appearing, it should be added to the list multiple times. If enemy groups are additionally set for an area, the enemy groups that will appear are a combination of the map and area combined.
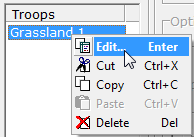
·If an enemy group on the [Troops] list is right-clicked, the shortcut menu will be displayed. Clicking on the menu's commands or the corresponding shortcut keys will carry out that option. The commands are as follows.

Edit |
Opens the [Encounters] window for editing enemy group settings. |
Cut |
Moves the entry onto the clipboard and deletes it from the list. |
Copy |
Places the entry onto the clipboard. |
Paste |
Inserts the entry on the clipboard at the right-clicked position. |
Delete |
Deletes the entry. |
·Under [Set Encounter Rate], specify the average number of steps (tiles travelled) for encountering enemy groups. For example, if set to “20”, the encounter rate will increase per step taken, and an enemy will be encountered around the 20th step. If set to “0”, no enemies will be encountered on the map.
6.Parallax Background
·Specify the image to be displayed in the empty areas of tiles. This can be used to give a sense of depth in high places such as towers and roofs.
·The background is displayed in the transparent parts of the lower tile layer. Even if a background is set, the image will not be displayed if there are no transparent areas in the map.
·The process for setting a background is as follows.
1.Enable the [Background] checkbox.
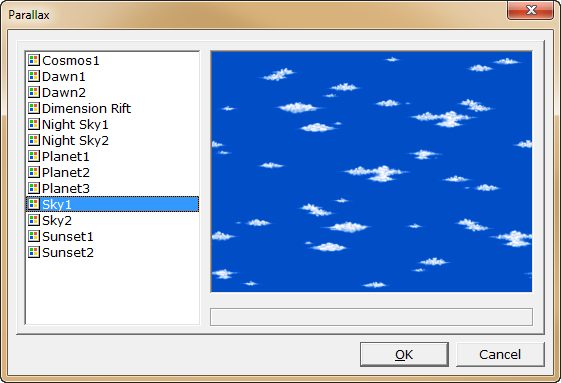
2.Click the [Set] button in the [Graphic] section. This opens the [Parallax] (background graphics) window.

3.From the list on the left side of the [Parallax] window, click to select the image file to use as the background. The specified image will be previewed on the right side of the window. Once the image has been chosen, click the [OK] button to close the window.
·On maps that are set to [No Loop], if an image that is larger than the map is set as the background, the background image will scroll at a speed such that the corners of the image will match the map's.
·If [Loop Horizontally] and/or [Loop Vertically] under [Options] are enabled, the background will loop in the respective direction. In this situation, the background will scroll at half the movement speed of the player.
·If [Auto Scroll] is effective, the background will scroll even when the player is not moving. The scroll speed can be set under [Speed] within a range of -8 to 8. If a negative value is set, the background will scroll upwards if scrolling vertically and leftwards if scrolling horizontally.
7.Teleport
·Specify whether [Teleport]-type skills can be used on the map.
oSame as Parent Map: Uses the same settings as the parent map (only possible if a parent map exists).
oEnable: Allows teleportation.
oDisable: Prevents teleportation. [Teleport]-type skills cannot be selected from the skills menu.
8.Escape
·Specify whether [Escape]-type skills can be used on the map.
oSame as Parent Map: Uses the same settings as the parent map (only possible if a parent map exists).
oEnable: Allows escaping.
oDisable: Prevents escaping. [Escape]-type skills cannot be selected from the skills menu.
9.Save
·Specify whether the player is allowed to save on the map.
oSame as Parent Map: Uses the same settings as the parent map (only possible if a parent map exists).
oEnable: Allows saving.
oDisable: Prevents saving. [Save] cannot be selected on the main menu.
10.Battle Background
·Choose one of the methods below to specify the background graphic that will be displayed during enemy encounter battles.
oSame as Parent Map: Uses the same settings as the parent map (only possible if a parent map exists).
oTerrain Based: Bases the background type on the terrain settings for the tile on which the encounter occurs. For example, if the tile has the “Mountain” property, the [Battle Background Graphic] for [Mountain] set under the [Terrain] tab in the database will be used. * Refer to [Terrain]
oSpecify: Use any graphic of choice. Click the [...] button to open the [Battle Background Graphic] window, and choose a graphic from the list.
11.BGM
·Specify the BGM that should play while the player is on the map, using one of the following methods.
oSame as Parent Map: Uses the same BGM as the parent map's (only possible if a parent map exists).
oEvent Setting: Use an event command to play the specified BGM. In this case, an event must be created on the map for BGM to play.
oSpecify: Play any sound file of choice. Click the [...] button to open the [BGM] window, and choose the sound file name from the list on the left side of the window.
Generate Dungeon
·“Generate dungeon” allows for the creation of dungeons with different layouts every time the dungeon is entered. This saves on the effort required to create a dungeon, and is effective for games that require the player to enter the same dungeon multiple times.
oTo use this function, check the [Generate Dungeon] checkbox. This enables the settings required for dungeon generation.
oThe necessary options for generating a dungeon are as follows.
12.Dungeon Type
·Path: Specify the width of corridors in the created dungeon (either 1x1 or 2x2). This needs to be specified if the dungeon type is “Corridors”, “Rooms” or “Maze”.
·If the “Room” type is chosen, specify the standard size of the rooms in terms of tiles.
·If the map should have a border, enable the “Surround Exterior with Wall Ceilings” option. If this option is enabled, the map will be generated with ceiling tiles bordering the map.
13.Ceiling
·Choose the map tile to use for the ceiling of the dungeon. Double-click the tile picture and select the map tile to use from the displayed window.
·If map tiles with automatically generated (autotiled) borders are used, a well-connected ceiling will be created.
14.Walls
·Choose the map tile to use for the walls of the dungeon. Double-click the tile picture and select the map tile to use from the displayed window.
·If only “Wall (low)” is selected and “Wall (high)” is disabled, the wall height will be 1 tile tall. If “Wall (high)” is enabled, walls will be 2 tiles tall.
15.Floors
·Choose the map tile to use as the floor of the dungeon. 3 types of floors ([A], [B], and [C]) can be set. The ratio of each type used is 4:2:1 respectively. Double-click the tile pictures and select the map tiles to use from the displayed window.
·Floor settings make use of the settings in “Tileset settings”, so damage floors and non-passable floors can be placed. However, if non-passable floors are placed, it may become impossible for the player to progress through the dungeon.
·As with ceilings, if map tiles with automatically generated (autotiled) borders are used, a well-connected floor will be created.
16.Obstacles
·Choose obstacles to be placed in corridors and rooms. Obstacle sizes can be chosen from 1x1, 2x1, 1x2, or 2x2 tiles in size (tilesets need to be edited). 3 types of obstacles can be chosen. Double-click the tile pictures and select the tiles to use from the displayed window.
·The placement frequency of each type of obstacle is the same.
oThe dungeon generation function puts a lot of stress on older CPUs, so performance may be worse on maps that are large, for example W 500 x H 500 maps.