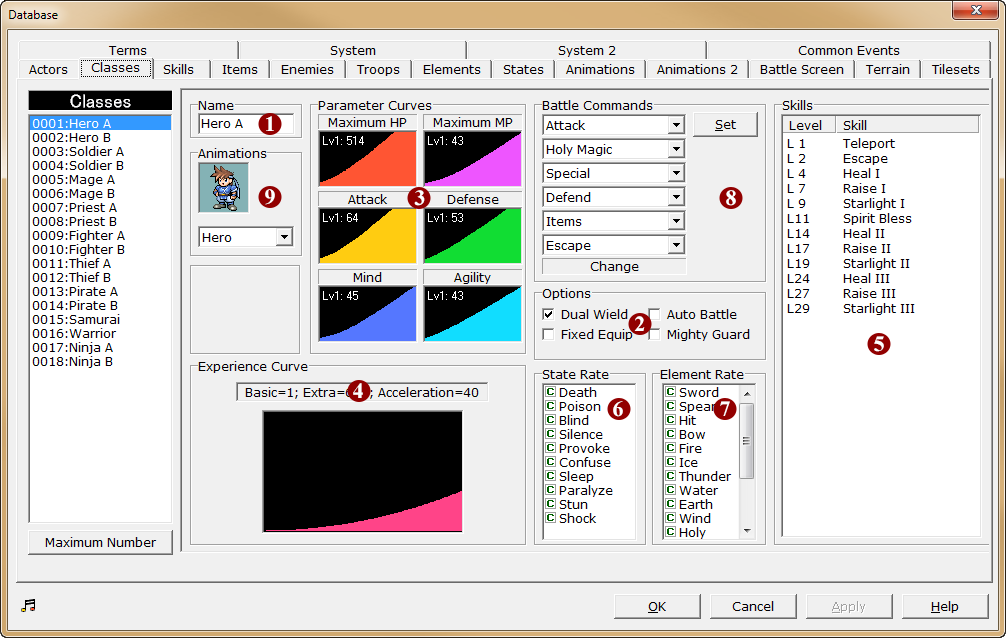
[Database] → [Classes]

1.Name
·The name of the job. The maximum length is 12 characters.
2.Options
·Sets the following special features for the class.
Dual Wield |
Allows the actor to equip weapons on both hands. In exchange for not being able to equip shields, the character will be more attack-oriented. |
Fixed Equip |
Disallows the actor's equipment from being removed. This can be used to prevent the player from removing equipment from an actor that has temporarily joined the party due to story progression. |
Autobattle |
In battle, the actor will not be controllable by the player, but act automatically. This can be used for helper characters that only appear temporarily. |
Mighty Guard |
The effect of the [Defend] command will be doubled, further reducing received damage. |
3.Parameter Curves
·Shows the level-based stat growth graphs of the 6 types of stats – maximum HP, maximum MP, attack, defence, intelligence and agility.
·The values shown next to “Now:” show the stat values at the actor's initial level, with the initial equipment.
·Settings are handled by double-clicking each graph to open the [Parameter Curves] window for editing.
4.Experience Curve
·Specifies the amount of experience required for the actor to level up. Settings are handled by clicking the [Settings] button to open the [Experience Curve] window for editing.
5.Skills
·A list of skills that the actor will learn on gaining levels. Skills are arranged in order of increasing level.
·To add new skills, double-click the empty space at the top of the list. In the [Skills] window, specify the level at which to learn the skill and the skill to learn. Alternatively, if an existing entry is double-clicked, the contents can be edited in the same [Skills] window.
·To delete an existing entry, click the entry in the list and press the delete key.
·The above Edit and Delete operations can also be carried out from the shortcut menu when the entry is right-clicked.
6.State Rate
·Specify the effectiveness of attacks that apply [Status Effects] on this actor, from 5 levels ranging between A~E.
·When the symbol on the left of the status effect name is clicked, the settings will change in decreasing alphabetical order and loop back to E after A (right click to change in the opposite direction). The exact level of effectiveness is based on the the defined [State Rate] in the [State] tab. As a rule, the closer to A, the more effective the attack is.
7.Element Rate
·Specify how effective the [Elements] of an attack is effective on the actor, from 5 levels ranging between A~E. The effectiveness is dependent on the defined [Damage Multiplier] in the [Elements] tab.
·When the symbol on the left of the type name is clicked, the settings will change in decreasing alphabetical order and loop back to E after A (right click to change in the opposite direction). The exact level of effectiveness is based on the the defined [Damage Multiplier] in the [Elements] tab. As a rule, the closer to A, the more effective the attack is.
8.Battle Commands
oBattle commands can be customized per job type.
oBattle command name settings:
oSets the command names. From the “Name settings” window that is displayed when the Settings button is clicked, click the number in the battle command list to edit, and enter the command name within a maximum length of 10 characters. At the same time, from the dropdown menu for the command's purpose, choose the purpose of the command.
oCreate battle commands for jobs:
oChoose the desired command from the dropdown menu and carry out customization.
oCharacters can have a maximum of 7 battle commands, and the bottommost command is fixed at “Change”. However, setting the topmost command to an “attack” command is recommended.
9.Animations
·Choose the battle animation to display for this job from the dropdown menu.