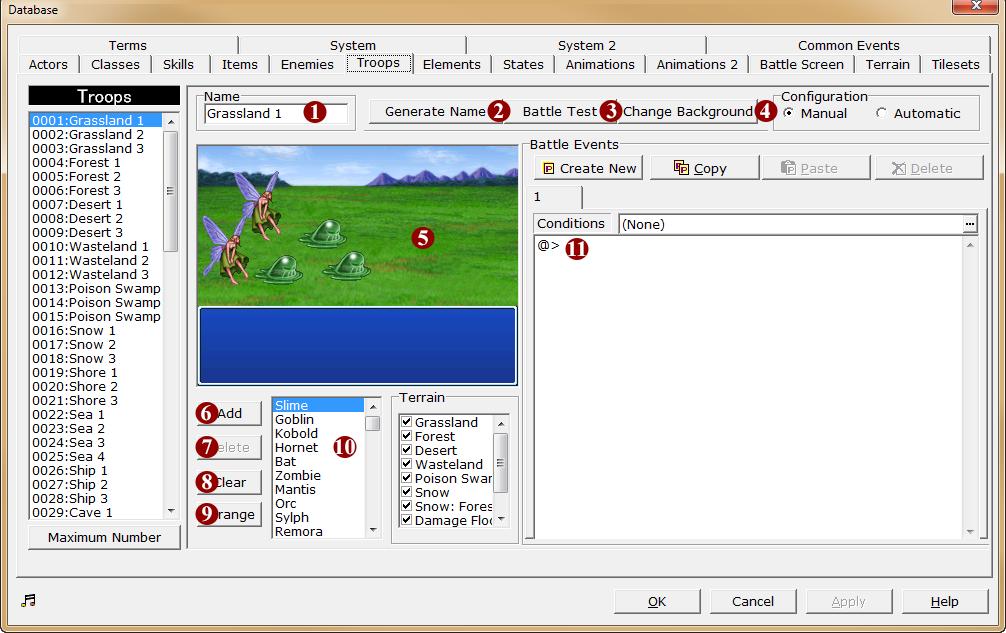
[Database] → [Troops]

1.Name
·The name of the troop (enemy group).
·This name is used to distinguish between data entries and will not be displayed in-game.
2.Generate Name
·Automatically generates a name based on the names of the enemies that make up the group. For example, if 2 “Zombie” enemies are listed, the name will be set to “Zombiex2”.
·However, please note that if the enemy characters' names cannot fit into the field, the name will be cut off.
3.Battle Test
·Starts a battle with the current troop as a test. In the [Battle Test] window displayed when the button is clicked, specify the test conditions.
4.Change Background
·Changes the battle background that is used in the edit view. From the [Battle Background Graphic] window that is displayed when the button is pressed, specify the graphic to use.
·This setting is only used during editing. This background may change in-game based on terrain, etc. The settings will also be reflected across all [Troops] (the same background will be used when editing all troops).
5.Edit View
·Displays the enemy characters that make up the troop. Enemies will be positioned in-game as they are in this edit view.
·While the left mouse button is held over a graphic, its ID number within the troop, name, and position (coordinate) will be displayed.
·To move a graphic, drag and drop the relevant enemy character. Movement is normally carried out in units of 4 pixels, but holding the [Shift] key while dragging will allow movements in units of 1 pixel.
·Right-clicking a graphic will display the [Appear Midway] command. If this is selected (the command is checked), the enemy will not appear at the start of the battle, but will join the battle when the event command [Enemy Transform] is called during a battle event.
·If [Automatic] is chosen under [Configuration] via the circular button, the enemy characters' positioning cannot be changed.
6.Add
·The enemy character selected by clicking on the list on the right will be added to the troop. The enemy character will be shown in the edit view.
·The graphics for enemy characters with the [Flying] option set will be placed on the upper part of the screen.
·The maximum number of enemy characters that can be placed in a troop is 8.
7.Delete
·The enemy character selected by clicking in the edit view will be removed from the troop.
8.Clear
·All enemy characters in the troop will be removed.
9.Arrange
·Enemy character positioning will be arranged in a line in order of increasing ID number, starting from the left.
·The graphics for enemy characters with the [Flying] option set will be placed on the upper part of the screen.
10.Terrain
·Specifies map terrain on which this troop can appear. The troop may appear on checked terrain types.
·For example, to create an troop that only appears at “Sea”, no options other than “Sea” should be checked.
11.Battle Events
Sets events that happen during battle with the troop. Please refer to the entry on Battle Events for details.
Random Enemy Parties
·Allow enemy characters to appear at random.
·First, create an troop with the desired enemy characters. Please make sure all desired enemy characters are included. Next, right-click the troop list, and click “Appear Randomly” in the list. The troop name in the list will be marked with (R).
·When this troop appears in the game, the number of enemies and group members will change with each battle.