[Show Picture]
Function
·Displays a picture (still or animated image).
·A maximum of 1000 pictures can be displayed at the same time.
·Using the [Show Picture] command will always reset the state of spritesheet animations and picture effects as well as transitions such as movement. To avoid this, use [Move Picture] with a duration of zero instead.
Settings

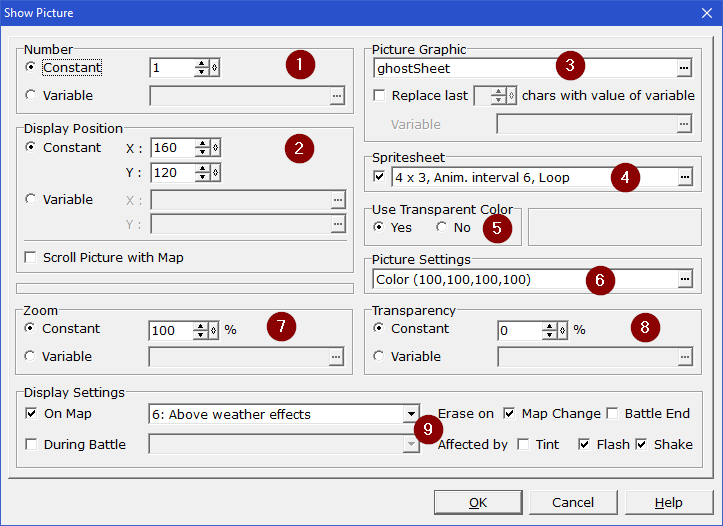
1.Number
·Under [Number], enter the picture ID number within a range of 1~1000.
·Select [Variable] in order to use a specified variable's value instead of a fixed picture ID.
If another picture is specified using the same picture ID number as a displayed picture, the newly specified picture settings will be used.
For example, if picture A is specified as no. 1, and another picture B is specified as no. 1 as well, the displayed picture will be changed from A to B.
Pictures displayed on the screen will be prioritized from the picture with the largest ID number first within the same layer (see paragraph #9 below). If no. 1 and no. 2 are specified to be shown on the same layer, picture no. 2 will be displayed on top of picture no. 1.
2.Display Position
·Under [Display Position], specify the location of the center of the picture in screen coordinates (pixels) using one of the following methods.
oConstant: Uses a specific location as the center of the image. Specify the horizontal coordinate (-640~960) under [X], and specify the vertical coordinate (-480~720) under [Y].
oVariable: Uses the values stored in variables for the center coordinates. The variables to be used can be specified by clicking the [...] button to open the [Variables] window, from which the number of the variable can be chosen.
·If [Scroll Picture with Map] is enabled, the center coordinate of the image will move along with the scrolling of the map. If disabled, the picture's center coordinate will remain at its defined position.
3.Picture Graphic
·Under [Picture Graphic], specify the picture to use as follows.
1.Click [...] to open the [Picture Graphic] window.
2.Click to choose the image file name from the list on the left, and click [OK]. The chosen image will be previewed on the right side of the window.
·It is possible to use a numeric suffix in picture names. This is an advanced feature which can be used to dynamically select a different picture file based on the value of a variable. Enable [Replace last ... chars with value of variable] to use this feature.
oYou can specify how many characters to replace at the end of the filename and which variable's value to use.
oFor example, if you have picture files named "Pic00" through "Pic99", you would set the amount of characters to replace to 2. In the event command list, the filename would then be displayed as "Pic??", indicating that those last two digits would be replaced with the value of the selected variable. If the selected variable now has the value 5 for example, then the picture file "Pic05" would be loaded.
·When "Show Picture" is used with the same image file as is already loaded for the same picture ID, the game will not attempt to load the file again from the harddisk. This means that there is no performance penalty attached to using "Show Picture" multiple times with the same filename for the same picture ID.
4.Spritesheet
·By enabling the checkbox in the [Spritesheet] box, you can use a spritesheet (i.e. an image file with multiple graphics on it) instead of an image file with a single graphic on it. You can also animate your picture by putting individual animation frames on the spritesheet. Please refer to [Spritesheets] for a detailed explanation.
5.Use Transparent Color
·Under [Use Transparent Color], choose whether to show the color that denotes transparency (the transparent color) in the picture.
oYes: Uses the transparent color setting and does not display that color.
oNo: Ignores the transparent color setting and displays the color.
6.Picture Settings
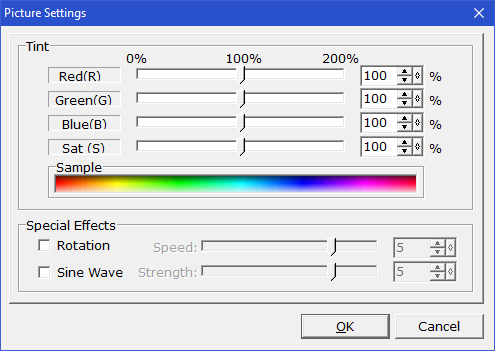
·Under [Picture Settings], you can change the tint and effects of the picture. When the [...] button is clicked, the [Picture Settings] window will open:

·Under [Tint], specify the tint color for the picture using the 4 components [Red (R)], [Green (G)], [Blue (B)] and [Saturation (S)].
To specify the components, drag their respective sliders, or directly enter values for them. The adjusted colors will be displayed under [Sample].
·Under [Special Effects], special display effects for the picture can be specified. Click the name of a special effect to enable it, and use the slider to specify the effect level. However, both effects cannot be used at the same time.
oRotation: Spin the picture. The larger the value of [Speed], the faster the image will spin. Setting the value to zero will pause the spin (this is useful mostly in a [Move Picture] command). Negative values can be used to spin counter-clockwise.
oSine Wave: The picture will move in wave motion vertically. The greater the value of [Strength], the larger the waves. Setting the value to zero will pause the wave animation (this is useful mostly in a [Move Picture] command). Negative values can be used to have the wave animation flow into the opposite direction.
7.Zoom
·Under [Zoom], specify the scale of the picture within the range of 0~2000%. If set to 100%, the picture will be shown at its original size.
·The zoom may be either set directly or using a variable's value.
8.Transparency
·Under [Transparency], specify the transparency of the picture within the range of 0~100%. The higher the value, the more visible objects in the background will be, and at 100%, the picture will become entirely invisible. When 100% is specified, no CPU power will be used for attempting to draw the picture on the screen.
·The transparency may be either set directly or using a variable's value.
9.Display Settings
·Under [Display Settings], you can specify under which conditions and in which "layer" the picture is shown, which screen effects are applied to it and under which conditions it is automatically erased.
·Pictures may be displayed on the map and/or on the battle screen. Select [On Map] and/or [During Battle] to choose. For each, a "layer" can be selected at which the picture should be drawn.
oOn the map, pictures may be drawn above any of the following screen elements which are stacked on top of each other:
§0: Parallax background
§1: Tileset elements shown below the player
§2: Events shown below the player
§3: Events shown at the same level as the player (including the player itself)
§4: Tileset elements shown above the player
§5: Events shown above the player
§6: Weather effects
§7: Animations
§8: Message window
§9: Timer displays
oDuring battle, pictures may be drawn above any of the following screen elements which are stacked on top of each other:
§0: Battle background
§3: Battler graphics and animations
§6: Weather effects
§8: Information windows and actor status display
§9: Timer displays
oSelect [Map Change] and/or [Battle End] to have the picture automatically erased on either condition.
oSelect [Tint], [Flash] and/or [Shake] to apply the selected screen effects (caused by the "Tint Screen", "Flash Screen" and "Shake Screen" commands or by animation effects) to the picture.